Showing posts with label oil seal. Show all posts

Sunday, 16 April 2017

Front wheel; spindle, spacers and nuts... A cry for help!!

A cry for help!!

Anyone know how to put this wheel back together? I am puzzled by
1. Where can I get a new hub oil seal? Diagrams show felt seals but the bike had a thin rubber seal here... I can get a suitable width and hole size but only too thick. Has anyone found a more suitable seal?

2. Secondly, the order and arrangement of the spacers etc on the front axle is confusing and I cant find a the best way to assemble. Sadly I'm not absolutely sure how it goes back ... Or if it was put together right when I got it, but all orientations seem to give some sort of problem, floating forks etc.

If anyone has a bike with this pattern of front wheel please let me know how its assembled.
Thanks

....Well my previous post about the front wheel turns out to have been premature and I still have problems fitting it. I have made many enquiries and eventually turned up these two diagrams for front wheel mountings ... Although there are probably more than two such versions. The early bikes had an arrangement where sleeve nuts fitted on both ends of the spindle, removing these allowed the spindle to drop out vertically through slots in the bottom of the forks. My earlier bike has this arrangement and it features a spacer and a second nut inboard of the left hand fork which presumably retains the hub as an intact assembly as its slipped down and out of the fork (nos 20 and 21 below). The oil seals in this wheel are felt washers both sides each retained by a two part enclosure the outer part of which appears to be quite large (14 in plate E). The rhs spacer inside the hub (ie the one that fits into the RHS oil seal, 13 in plate E) is separate from the hub nut/bolt, the LHS spacer fits into the oil seal on the LHS.

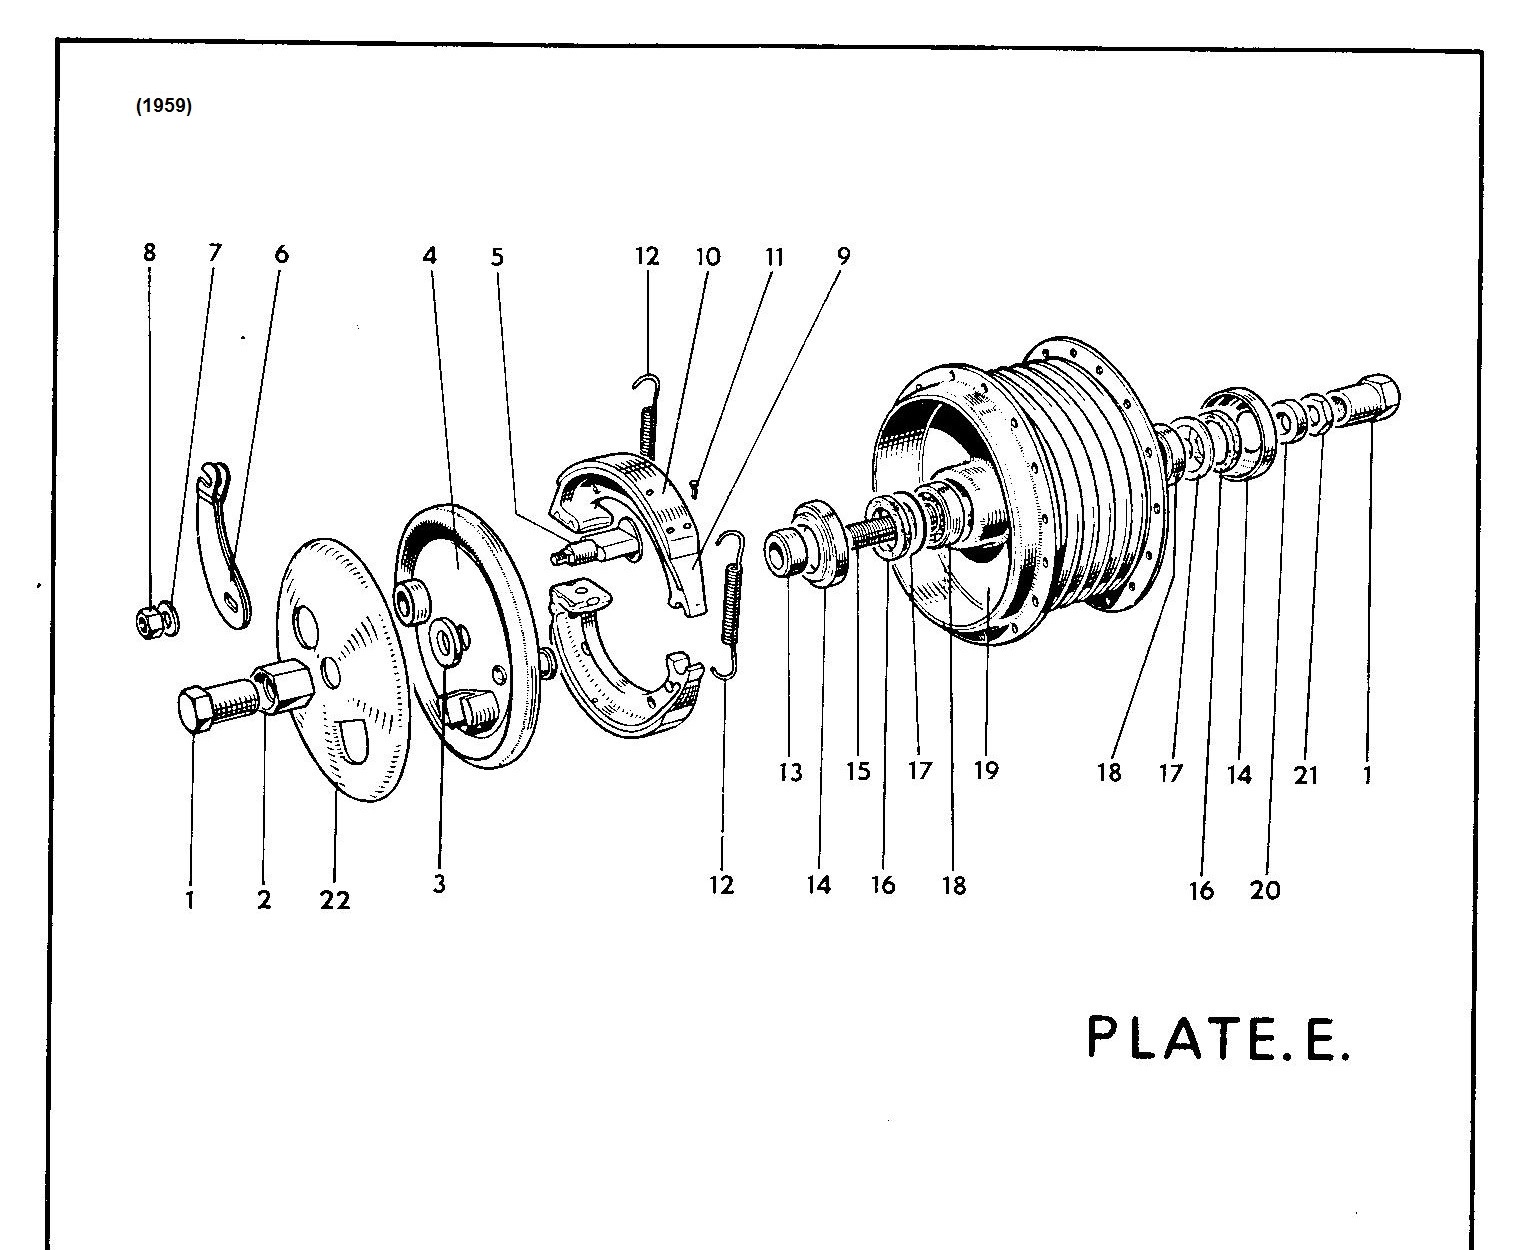

One for 59 and one for later shown in the 1963 re-issued parts list with drawings. This is shown below:


There are several differences although the main one is that the spindle has been changed removing the need for the sleeve nut on the RHS, this is replaced with a cast hole allowing the spindle to be held securely whilst the sleeve nut on the LHS is tightened or loosened. The internal hub spacer on the RHS has now been amalgamated into a modified hub fastener (3) which penetrates the felt oil seal when the hub is assembled. This oil seal is now containied in a slimmed down enclosure (17 plate EB) that's a neat fit inside the hub core (rather than over it as in the earlier design... I think). The Left hand side has also been modified. The oil seal has been replaced with a rubber seal (18) retained in a one-piece slim enclosure identical to that now on the RHS (17),  and the 15mm spacer and second (hub retaining) nut have vanished, although now the larger cover (14 in plate E) that presumably used to be used as the "enclosure" for the felt washer  is now referred to as a "spacer" itself (16 in plate EB) and has presumably been modified from the simple cover present on both sides of the '59 wheel (14 in plate E) to combine the functions of both cover and spacer in a single part. Certainly these two parts have different part numbers but the diagram is insufficiently clear to explain any difference between these components.

This change is listed in terms of parts in the 1961 parts list supplement, although this has no diagrams. The change in design took place between the two bikes I own and the question is whether it was introduced in one go or via a transitional stage. The reason I raise this is because my wheel is the later type from the RHS, through the bearings and hub (and even had a LHS rubber oil seal when dismantled) but beyond the oil seal my spindle still had a cover and a separate 15mm spacer, looking quite like the earlier bike setup- although the LHS internal thin hub nut in the earlier design  is not present. So... was this a transitional fitting where perhaps the spacer and cover were left separate for a time, a later mod by a PO, or is the diagram wrong in that the possibility of a separate spacer has simply been missed out of the 1963 illustration and list?

The whole thing is compounded because I cant get the wheel to centralise in a fixed position. This is because unlike other bikes where a nut bolts up against the fork leg to tighten, the sleeve nut tightens through the fork leg, the leg itself can slide along the sleeve no matter how tight the bolt is fastened- unless something such as a spacer holds the leg in one position on the sleeve and prevents this movement. Presumably all play should be taken up when the sleeve nut is tightened, meaning that the head of the nut should be flat on the outside of the fork, the spacers should be nipped up through the oil seal and against the bearing. There should be no free sleeve nut visible either inside or outside the fork as this would allow the fork to move along the sleeve so I assume that this must slip inside the spacer as its tightened through the fork leg. In my case when the sleeve nut is tight there is still movement in both the spacer and fork leg... which in turn means the wheel isn't held firmly in its central location. I cant help feeling that the problem lies in the spacer on the lhs which is too short... or perhaps the modified spacer/enclosure that should be here has been broken or missing and replaced with parts from a 59 bike?

Not always quite so lonely in the garage- here an occasional visitor!

Front wheel spindle as removed. Note all fixtures on the right have been reassembled into the brake plate and hub assembly. The solid axle terminus is on the right in this photo and the sleeve nut and spacer on the left. Note that the spindle has slight shoulders machined into it and also that the spacer has one chamfered and one square end. When removed the chamfered end was towards the outside of the spindle on the LHS.


Interestingly the spacer sits in different positions; when fitted each way round. Chamfer inwards it slides onto the axle over the machined shoulder to the position marked in blue...

... and chamfer outwards (as it was found on removal)  it slips on only to the position shown above.
Consequently the spacer appears to be counter-bored and this is presumably so that the extra width can allow the sleeve nut to enter the spacer and so avoid exposing excess sleeve nut on the inside. However in this orientation it may not contact the lh bearing in the hub.

Thursday, 1 October 2015

Norton Jubilee Front Wheel and Brake

The removal of the front wheel and the structures I found on the axle/spindle are described at the start of the entry "Refurbishing the front forks..."


On the credit side the front tyre as fitted to this bike looked fine! However the front brakes are  poor to non-existent and tended to jar in use. I had already removed the front wheel and this is what I found...
Oil seal enclosure visible in hub, there should have been a separate spacer in the centre of this seal, Bearing grease looks bad, they felt rough. . Inside of hub quite rusty
 This bike was a surprise in terms of hub oil seals, instead of the expected rubber or nitrile lipped seal, the bike uses a system of felt washers held within an enclosure formed by a recessed washer into which the felt fits and a backing washer that provides pressure forcing the felt into contact with the axle spacer.. The top of the recessed washer of this felt enclosure is visible in the hub centre, and the oil seal could be pulled out with a slide hammer - which I did at this stage although in hindsight it would probably be preferable to drive it out with the bearing at a later stage.

Internal hub felt seal, Felt housing on left and backing washer on right. Note remnants of felt washer  inside the housing- clearly deteriorated and serving no useful purpose at all!
On the reverse of the hub itself there was a domed cover which retains a second oil seal enclosure.

Domed cover (left) and oil seal enclosure (right). This seal had no felt and no backing washer. Instead a more modern nitrile/rubber seal had been installed in the enclosure.
The seal on the hub exterior was a surprise in that the inner washer to the housing was missing and the felt itself had been replaced with a more modern oil seal. However this had not fared well, it was badly damaged and distorted. I need to consider how best to replace this. The cover plate (above) is from a pre 1961 style front wheel; these had a felt oil seal and two part enclosure on both sides. There was also (as in this case) a separate spacer on the spindle that penetrated and sealed the oil seal around the axle. However both of these features were changed in 1961 when the front axle was redesigned to a knock through rather than a drop-out format. The solid axle was redesigned on the rhs as was the brake plate retaining bolts and these were as found on my bike. It seems therefore that this bike has a 1961 design on the right hand side up to and including the rubber/nitrile oil seal in its enclosure on the lhs. However after that the parts have been substituted for those from a pre 61 bike with separate spacer and cover although the locknut was missing. This doesn't seem to be adequate to fix the wheel in the right position laterally between the forks and will need further investigation on reassembly.

Brake backplate, some signs of grease escape, brake shoes scuffed. Note combination nut-and-spacer in centre which fits into the felt oil seal in the inside of the hub.


I decided to strip and clean the brake mechanism and replace the bearings and oil seals. The first step was to remove the brake back plate from the front plate. This is held on by a large nut and this component puzzled me for a while as its not shown in the parts list. However it seems to be a replacement for two separate parts and effectively combines the nut with the spacer that fits into the hub oil seal.

Brake plate fittings, combination nut-and-spacer and external nut removed all according to the post 61 design.
Remove the brake shoes by bending them upwards- these springs seem very strong!
Once these were removed the brake backplate was still attached to the painted front plate by the operating lever. There is a small spacer between the two plates.

Brake shoes removed. Note two small shoes (slippers) for the operating levers-presumably to prevent wear in the softer shoe heels where they bear on the steel operating lever- unusual, I've not seen that before!

Brake lever components detached
The brake lever was a little awkward to remove, I held the external nut downwards in a vice and turned the operating pivot with a pair of grips to unscrew it. Here the components are laid out. There is also a square cut washer beneath the brake lever which prevents it jamming on the hub in use. This washer hasn't yet been removed from the spindle.


Brake operating pivot components removed and cleaned. Note spacer from between the plates (top row) and the square section washer removed from the brake arm pivot (bottom row)

Smear of copper grease on operating spindle
The complete set of components are here removed and cleaned with a wire brush. There was some corrosion on the operating lever pivot which wire brushed off. The hub front and back plates were reattached using the "combi" spacer-nut system remembering to include the spacer between the two plates
Operating lever pushed through backplate. Don't forget the square section spacing washer before refitting the arm, top washer and nut


 and on the slipper plates to stick them onto the operating pivot whilst...
another blob is applied to the top of the slipper plates in contact with the shoes.
before positioning the shoes as above and folding them down. Note that their feet will probably need to be levered up slightly so that they click into position as the shoes are flattened.

 I haven't yet changed the brake shoes, although these are scuffed they do not seem to be contaminated and there is plenty of material left on them. I will give these a chance to "bed in" and hope they will improve with use. If not then new shoes will be needed. Although its not shown here I also cleaned and degreased the inside of the hub drum with wire wool and methylated spirit.

 Bearing and Oil seal replacement

Front wheel bearings in this bike were originally of the open type. This requires an efficient oil seal to retain grease so I decided to upgrade to sealed bearings which do not require free grease and are therefore more tolerant of poor oil seals in the the hubs themselves. I decided to use the original felt washer enclosures so that all the spacings and clearances should be maintained. However, I havent yet decided whether to use these with the original felt washers or to use a more modern equivalent. The washers are not available precut so I ordered some 8mm oil seal felt to cut my own and I also ordered some narrow oil seals (24x36x6 Simplybearings.co.uk) which might also fit into the housing. However, bearing in mind the poor condition of the seal removed from the left had side of the wheel, I think its necessary to include both parts of the enclosure and so I needed a new flat washer base. These are also no longer available but fortunately 32 mm penny washers are still readily available and so I bored one out so that it would slip over the spacer in the axle. I will test the two systems to see which is most likely to work. (Note I have since found the felt washers listed in the Norton Owners Club shop.)

The bearings were an easier replacement as they are still available as 6202-2RS (35, 15, 11 mm) and I bought two made by SKF from bearingboys. The bike has a bearing on each side and a tubular spacer in between. Removing the bearings is simple, I knocked the out from one side using an old screwdriver drift which engaged nicely with the bearing spacer junction.
Using a drift to knock the bearings out from above- note support hub on wooden blocks. 
Later I discovered that the manual suggests  to knock the bearings and seals out together using the bare axle- probably a better idea!
Inner bearing removed- end of spacer visible inside hub

Spacer lifted out- nasty gunky thing!
 The opposite bearing was then easily drifted out from the other side. The new bearings were easily tapped into the hub (I used a Bergen motorcycle bearing set). Interestingly one of these was loose and tended to drop out. This is a little ominous and I'm hoping it doesn't indicate out-of-round. However it was a reasonable sliding fit so I secured it using Loctite 603 (oil tolerant).
Tapping in bearings using Bergen drift set.

Oil Seals
I'm not sure what to do about the oil seals, having made a new backing washer for the enclosure I could replace the felt seals both sides. However this seems to need 8 mm felt as the 5mm that I have isn't compressed in the housing. The alternative is to use more modern shaft seals, although the fate of the previously installed example suggests that they shouldn't be used without the base washer. I bought two 24x36x6 mm nitrile rubber rotary shaft seals R21/SC from simply bearings. These fitted nicely into the  cupped enclosure washer although they were a little too thick.
Seal as above and enclosure washers, the seal was pressed into the washer easily with hand pressure.

Fit the flat washer first... at this stage I felt that this had been lost from the wheel and so I made one up to replace it. However, I have now discovered that a rubber seal should be fitted without this inner washer and that may explain why the hub later proved problematic on assembly.

Then the oil seal in enclosure and tap home
The oil seal fitted well and might work...? I am slightly concerned that it doesn't seem to clip into place and the whole housing seems to rotate whereas usually one side of the seal would be held stationary, however I can't yet tell if this will stop when the wheel is reattached. Secondly an oil seal wouldn't usually be compressed, but here as it is thicker that then the enclosure is deep* its likely that it will be under some pressure if indeed the extra width of an oil seal on both sides doesn't prevent me from fitting the wheel back in the forks!  I wont be able to tell this until I have finished the fork repair and refitted the sliders. Lastly an oil seal would usually have grease on at least one side to provide lubrication. The new bearings don't require free grease and the seals here are really only to keep the dirt out of the wheel rather than contain oil/grease in the hub, however I will put some grease below the seals for this purpose.
* this may well be because at this stage I had fitted an inner washer which has prevented the seal from seating properly.
I have ordered some 8mm felt and will prepare some thicker felt washers so that I can try both systems.


Once the forks were repaired I was able to fit the wheel. Here I found that the internal oil seal fitted inside the hub (brake plate side) worked well, it assembled and fitted well. However the excess thickness on the seal caused problems on the left side of the wheel. Here the thick seal prevented the seal enclosure  (dished washer) from seating into the hub centre. Since this didn't seat, the external cover could also not clip onto the wheel and was left loose and spinning when the wheel was tight in the forks. To cure this I had to remove the oil seal and reassemble this side using the felt washer seal instead. I oiled the felt and the seal retainer now clipped into the wheel hub and the dished cover clipped firmly over that.